So, I've noticed a few posts on certain climbing websites discussing ganglion cysts within the fingers, and so decided that I would write a post about them, considering there were one problem I omitted from the original finger injuries post. What is a ganglion cyst?
A ganglion cyst is a liquid filled area within a joint capsule or tendon sheath that has bulged out to a particular side. These cysts are caused by a congenitally weaker part of the capsule or sheath that cannot handle the extra pressure of over-creation of synovial fluid, which is created by over use and chronic stressing of joints. They can vary in size from pea to golf ball sized, and can occur anywhere in the body but most commonly in wrists and fingers. The size is often related to the amount of stress placed on the joint, therefore more stress = larger cyst, and this is why they most commonly occur in flexor tendon sheaths of climbers, just before the first finger joint. Ganglions are normally harmless but can cause pain, especially if they irritate a nerve.
Symptoms
Pain
Visible swelling of a lump
Decrease in mobility around the joint
Treatment The old adage of "smack it with a book" doesn't really work for cysts, no matter how much someone encourages you! As, even if it works and gets rid of the cyst for a little while, it will only refill. Common treatments involve aspiration, steroid injection, or surgical removal of the cyst, however, some have suggested ultrasound as a treatment for the pain caused by the cyst.
Some people have steroid injections into/around the cyst to relieve the pain, however it is worth noting that steroids have been known to weaken tendons and tissues and so could cause further problems with the cyst. Varley et al (1997) found that there was equal success rate of removing a ganglion cyst (33%) with aspiration (insertion of a needle and draining the fluid, as depicted above) compared with aspiration and injection of steroid. The other option is to have the cyst surgically removed, which has a re-occurrence rate of the cyst of only about 5%.
Prevention Unfortunately, there is no current way of preventing a ganglion cyst, however they could be caused by unnecessary stresses on your joints, so avoiding or adapting the effect of these stresses could help, for instance, adapting / changing your climbing style, climbing more efficiently.
Ensuring full range of movements within your joints will also reduce the stresses put on the joint. As usual, ensuring proper warm up/cool downs and eating well will aid the prevention of injuries. References
Hochholzer T, Schoffl VR 2006 One Move Too Many. Lochner-Verlag, Germany NHS Choices Varley GW, Needoff M, Davis TRC, Clay NR 1997 Conservative management of wrist ganglia: Aspiration versus steroid infiltration. Journal of Hand Surgery 22(5): 636-637
Getting children involved in climbing is fantastic, especially as
climbing can be viewed as a life-long sport. However, we'd like to
keep it that way, and the process to do this is prevent any injuries
that will impact the kids in the future. The main problem with injuries in children is any damage to the
growth plates of any kind, and the most likely growth plate to injure
is those that are sustaining high stress forces through them, such as
the fingers. This post will aim to explain what growth plates are,
the incidence of these injuries, and how best to avoid them. Remember, children are children, not just “mini adults”!!! What are growth plates? As a child grows, all their bones start of as cartilage, and
develop into bone as they get older. This is why a child's rib cage
is much bouncier than an adults (please don't test this out!). This
is why children are more likely to get greenstick fractures than pure
fractures (this is where the bone bends and splinters, rather than a
pure breakage – try this out with a freshly cut tree branch and try
and snap it). As these bones develop, there are areas where the bone
needs to grow.
The epiphyseal plate (or growth plate) is where new bone is formed
to make the bone grow in a longitudinal direction, and on the
otherside of the plate, the new bone growth becomes calcified. There
is one of these growth plates at either end of the growing bone.
When this growth plate is damaged, the growth of the bone can be
changed, from direction, to rate of growth or even stop growth
altogether.
Whilst growth plates are still growing, they are the weakest area
of the growing skeleton, 2 to 5 times weaker than adjacent ligaments.
This is due to the connective tissues needing to allow for the growth
of the bones. Once growth has stopped, the epiphyseal plate is replaced with
solid bone through calcification, and ceases to be an area of
weakness.
Obviously, weight bearing is key for bone development and growth,
however, it is the overuse and over-stressing of these structures
that we are concerned about. Time line of growth plates If I remember correctly, during the closure of growth plates, the
larger bones will fuse first, then the smaller joints. Also, the
dorsal aspect of the growth plate closes last.
This means that the fingers are susceptible to injury longer than
larger bones such as the femur or humerus, and the dorsal aspect of
the epiphyseal plate is usually where an overuse injury will occur in
a child’s finger.
The picture above demonstrates this area of weakness, with a grade
3 Salter-Harris fracture. Fingers stop growing at a biological age of 17 years old, but key
timings to note is that of growth spurts, occurring from around age
12-13 for girls, and 13-15 for boys. Especially for boys, this is key to note, as growth spurt plus
testosterone = temptation to train harder due to the ease in which
muscle bulk is put on in this period.
Incidence of growth plate injuries Amongst junior competition climbers studied within the German
National Junior Team by Volker Schoffl and friends found two-thirds
who trained regularly on the campus board got fractured growth plates
in a finger.
Shigeo Omori and Hajime found over 3 years, 182 junior competition
climbers aged 7 to 19 had their fingers medically examined and 77.6%
of these climbers had abnormalities, mostly deformation and light
flexion contracture (can’t place hand flat on table).
In general, non-climbing public: Growth-plate injuries comprise 15 percent of all childhood
fractures. They occur twice as often in boys as in girls, with the
greatest incidence among 14- to 16-year-old boys and 11- to
13-year-old girls. Older girls experience these fractures less often
because their bodies mature at an earlier age than boys. As a result,
their bones finish growing sooner, and their growth plates are
replaced by stronger, solid bone.
Approximately half of all growth plate injuries occur in the lower
end of the outer bone of the forearm (radius) at the wrist. These
injuries also occur frequently in the lower bones of the leg (tibia
and fibula). They can also occur in the upper leg bone (femur) or in
the ankle, foot, or hip bone.
Mechanism of injury Can be acute injury such as a fall, or can be a chronic onset
caused by intense training, campus boarding or over-use of the crimp
hold grip which causes compression or shearing of the growth plate. It has been found that these injuries normally occur in climbers
within the training scenarios rather than competitions. Crimping or campus boarding has been found to be a cause of growth
plate injuries due to the high loads put through the fingers,
therefore causing an overload of growth plate (repetitive stress). Signs and symptoms Lack of mobility in fingers Constant pain Chronic swelling Lack of crimping ability due to pain/swelling
The old mandate of “No pain, no gain” is crazy! If it hurts,
get it checked out!
Diagnosis of injuries
The diagnosis and classification of a growth plate injury is
normally via x-ray, and is classified as 1 to 5 Salter-Harris
fracture.
Treatment
As with all fractures, this depends on the severity of the
fracture, but will probably comprise of: Immobilization Manipulation or surgery Strengthening/Range of movement exercises Implication of these injuries
Rotation/shortening of finger Incomplete growth Deformity Some papers suggest there is a link between climbing from an early
age and early degenerative changes later on in life such as
arthritis. These will all obviously affect the child later on in life. How to avoid these injuries?
Avoid campus boarding under 18 years of age. Many famous
climbers never touch a campus board – Steve Mclure, Tyler Landman
so why does the kid?!
Excessive Crimping – try and promote versatile grip
strengths
Long / intense training sessions
No need to train strength pre-pubescent – due to motor
skills still need to catching up with growth spurt.
Avoid additional weight when climbing
Dynamic moves – limit
When training, try to discourage competition, as it will
inevitably lead to someone getting an injury
Train other areas, such as core, antagonists, balance,
movement technique
So this post, I thought, would be nice to show you some exercises that can be used for warming up, cooling down, or rehab of the fingers (with a little of the forearm and wrist thrown in). See previous blog posts on finger injuries, symptoms and management,pulley injuries, and hand anatomy for more information.
Sorry to those reading on a mobile app - I'm afraid the formatting performed for this post doesn't carry over to the mobile format very well!! Below is a sample arrangement of equipment that can be used for rehab or warm up (plus a Metolius GripSaver, but I seem to have misplaced mine, so I had to borrow some pictures from the Metolius website!). I will discuss various exercises that can be performed with each piece of equipment. Before performing any of these exercises, ensure you are warmed up (as in raised core body temperature) to prevent any injury. No information has been given on repetitions or strength of items, as that is a very individual and tailored aspect to incorporate.
Powerball
Now, I must confess, the Powerball is much more focussed on wrist/forearm rehab and warm up rather than the fingers, but I thought I'd include it anyway, and is useful for general warm up of the arms before performing specific exercises.
The Powerball is used for rotation about the wrist. If you have one, when using it, remember to vary the direction you spin it in, as it then uses your muscles in different ways. I'm not going to dwell much more on the Powerball, but useful for warm up generally.
Hand Therapy Balls
These "stress ball" type items are brilliant for rehab and warm up. They come in various "strengths", but personally, the weaker the better, as then you can easily add more repetitions of the exercise to get more of a workout, and is therefore more versatile.
For a simple warm up exercise, the ball can be squeezed repetitively in a gross grip manner to get the muscles working. When relaxing the grip, make sure you spread the fingers back to a "flat palm" position to ensure the fingers are going throught their full range of movement.
Next, more specific exercises. Squeeze the ball between thumb and finger, alternating fingers.
Next, squeeze the ball using two finger grips such as middle and ring, or index and middle fingers.
Then you can try and mimic a crimp position using a two finger hold (or you can do it with all fingers)
A tricky one next, and is difficult to do anyway, but would be even more difficult with a higher strength ball. Squeeze the ball between two fingers (I'd recommend doing this with the ball held by the other hand) This works the hand interossei muscles (the muscles that adduct and abduct the fingers)
Remember to perform in all finger spaces!
And finally, to work the lumbricals, squeeze the ball by only flexing at the metacarpophalangeal joint.
Elastic Bands
So, onto the cheapest form of rehab equipment - the majestic elastic band! These are much better tool for working the interossei muscles, and you can vary the difficulty of strength by simply using a thicker elastic band, or by moving it up a joint.
I've demonstrated using the elastic band at the distal phalangeal joint for illustration purposes, and would normally begin with this exercises as close to the metacarpophalangeal joint as possible (nearest the base of the finger).
The final exercise with the elastic band are pictured. This exercise consists of extending the fingers against the elastic band, thereby working the forearm extensor muscles, to ensure muscle balance. This exercise can be done with or without extending the thumb, made easier or harder by moving the elastic band towards the more distal joints. You can move each finger individually(ish!) or all together, depending on what you want to work. Have a play and feel what works for you!
GripMaster Now, I know alot of climbers own these, and they are ok, but in no way as flexible as a therapy ball or elastic band.
These exercises have been inspired by those on the GripMaster website, though many are similar in nature to those that can be performed with the therapy ball.
Again, individual finger to thumb flexion can be performed. This can be performed with the GripMaster sitting in the base of the thumb or thumb tip as pictured.
This, again, can be done with all fingers, and with the combination of two finger grips
Key pinch grip can be performed, however, is not very functional in a climbing aspect (well, not that I've found yet anyway!)
And again, similar to the hand therapy ball, gross grip warm up, or gross finger tip grip can be performed.
Metolius GripSaver
So, the Metolius GripSaver incoporates the elastic band extension exercises with the therapy ball flexion exercises, but isolates each finger better for the extension aspects of the exercises. They are useful in their own right, but I suppose it's personal preference! All the exercises have already been described above.
However, this can be recreated in a fashion, with the therapy ball and elastic band, as shown!
I hope these exercises provide you with some ideas and handy hints to warming up and rehab of injuries.Any comments, let me know!
P.S. The theraband was shown in the first picture as you can use it in a similar way to the elastic band extension exercises, but is less specific and more awkward to use, so I didn't include it!
Flexor tendon pulley injuries occur most commonly in rock climbers, accounting for 27% of all finger injuries (Schoffl et al 2003). This post will revisit the anatomy, and look at the causes and symptoms, and then discuss treatment methods. Please note: any finger injury sustained by anyone under the age of 18 should be seen by a professional due to the risk of more severe injury such as an epiphyseal plate injury
Anatomy
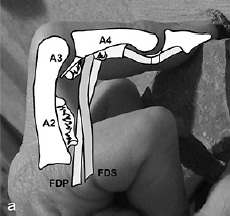
Understanding the anatomy within the fingers is key to understanding the injuries to the pulley system, therefore, I will cover some old ground of the finger anatomy. Firstly, the tendons involved in the fingers are the flexor digitorum profundus (FDP) and the flexor digitorum superficialis (FDS). These are both involved in flexing the finger joints.
This is worthy of note, as the A2 pulley contains the both these tendons, whereas the A4 pulley only contains the tendon of the FDP as the FDS splits and inserts to the lateral sides of the A4 pulley (see image below).
This means more force is exerted on the A2 pulley than the A4 (hence why climbers most commonly injure the A2 pulley)
This image shows how the FDS splits and inserts laterally to the joints, therefore not passing through the A4 pulley
Ligaments of the finger
This means that the A2 is 1.5 - 2 times more likely to be injured than the A4 pulley. (N.B. The A2 pulley is found near the base of your finger)
The ring finger is the predominantly injured finger, due to the middle finger being supported by relatively strong and long fingers, whereas the ring finger only has a strong, long finger on one side, and flanked by the relatively weak little finger, meaning it is more susceptible to injury. Check this out for real-life anatomy of pulleys on a cadaver (Note: not for the
faint hearted!) Causes
Causes of a pulley injury can be from:
Foot slip etc when crimping a hold
Dynamic pull from a small edge
Dynamic move to a small edge
One finger pockets
Repetitive strain
Crimping is one of the main causes, due to the orientation of the finger joints; the proximal interphalangeal (PIP) joint is flexed more than 90 degrees and the distal interphalangeal (DIP) is hyperextended, therefore there is a much higher force on the pulley system due to the friction caused by the tendons.
Copyright Schweizer
Copyright Schweizer
Severity of the injury With a pulley injury, there are degrees of severity of the injury, graded from I to III:
Minor sprain to the ligaments and pulley
Partial tear to the pulley
Complete rupture of the pulley
The degree of the damage obviously will impact on the rehab and time to heal. With a Grade III, you will be very limited in what you can do, whereas a Grade I there will be more flexibility.
Symptoms
Symptoms of a pulley rupture may consist of:
A loud, audible pop (normally for a complete rupture) accompanied with pain (See above video)
Swelling at the base of the finger
Bowstringing of the tendon visible or on palpation
Limited mobility of the finger
If a partial tear occurs, you may find:
A small audible pop
Sudden onset of pain after grabbing a hold
Swelling
Limited mobility of the joint
However, you may not notice the injury until the next time you climb, and providing the acute swelling isn't too bad, you should find you are able to pull on holds open handed without any pain, but have acute pain on crimping of holds.
A partial tear of a pulley could alternatively be misdiagnosed as a "flexor unit strain", also known as a lumbrical tear (detailed in this post), or vice versa.
Diagnosis The diagnosis of a pulley injury is normally based on the subjective history, and clinical examination (e.g. bowstringing). Ultrasound can be used to confirm bowstringing (bowstringing only occurs in complete ruptures).
Copyright Hauger et al 2000
MRI can show an A2 injury, but is not commonly used.
Copyright Hauger et al 2000
Sagittal T1-weighted spin-echo (400/22) MR images obtained at (a) extension, (b) flexion, and (c) forced flexion after the creation of complete lesions of the A2 and A3 pulleys. In a, obtained at full extension, no obvious gap between the tendon (arrow in all) and the bone (arrowhead in all) is shown. A small gap is noted in b and is maximized in c. (d) Sagittal cadaveric section obtained at forced flexion reveals the gap to be almost identical to that seen in c.
Copyright Hauger et al 2000
Treatment
In the past, it was encouraged for a surgical approach to repair pulley ruptures. However, nowadays, a conservative approach has been found to be equally effective. Rest Climbing should be stopped only for the period in which the joint is inflamed, and it is recommended this period should be around 1-3 weeks. Obviously this depends on the level of injury, as a complete rupture will require longer time off, whereas a partial tear will require less. Once the joint can be moved through it's full range of movement pain-free, then this is a good indication that you may be able to start gently climbing again. Rest also includes sleeping well and having a healthy diet, as these often aid the recovery process. I generally find this
“rest” period can be used to train other areas, such as those
antagonists you've never got round to training, or that core strength
that you just don't have time for at the wall.....! Ice/Cold Water Therapy Again, a principle from a previous post on acute injury management, icing the affected area will help promote healing and reduce inflammation Within this is also the idea of contrast baths. However, there is limited research
that they work, and no set prescribed pattern of time frame or
temperatures.Google them, try them, make your own decision! You can also try and use this clever device by BananaFinger to ice the finger. Stretching and massage Stretching the affected joint helps optimise the alignment of the healing fibres. A stretch needs to maintained for at least 30 seconds to have any affect. Warming up prior to stretching is recommended. Massaging the affected area can also optimise fibre alignment and break down any scar tissue forming, but needs to be
quite vigorous and can be quite painful in order to have any effect. Recovery Aids
Metolius Grip Saver
Exercise Balls (e.g. Theraband)
These aids shown can help slowly regain strength to the injured finger without requiring to climb on it, and are useful in the early stages of rehab.
I am particular keen on the Metolius Grip Saver as you can use the ball to work the extensors to your fingers as well as flexing them, ensuring an equal work out to the muscle groups. (See this post on hand and finger exercises) Within these aids is "TheraPutty", or glorified PlayDough. Use it in the same way you use the hand exercise ball. Some people also use those Chinese stress balls, the heavy metal ones you rotate in your hands. These are good too. It's about finding what best works for you. Taping Several techniques can be utilised for taping of pulley injuries. The idea of taping is to reduce the acute angle of the flexor tendons, as shown in one of the images below. The tape takes approximately 10% of the strain from the pulley system, and can allow climbing with support to the injured finger, but remember it doesn't cure the injury, and only lasts a short period of time before the tape slackens off. Tape will also not
prevent pulley injuries, nor support the injury once nearly healed
(however is not going to harm the finger in any way, apart from
giving you a false sense of security that the injury has healed when
it may not have, or be stronger than it is). There are two techniques, the main one being H-tape, shown below: H-Tape Watch the video below, or here's a link to a picture guide of how to H-tape
The shape of the H-Tape
Other technique: This technique is offered by Schwiezer 2012 (However, personally, I think the H-Tape has a better practical use and changes the angle of the tendons more effectively and limits the finger movement less)
Showing a different taping method, and how the tape is designed to re-orientate the flexor tendons
.
Copyright Schweizer
Schweizer tested two kinds of taping on
16 fingers during the typical crimp grip position.
Taping over the A2 pulley decreased bowstringing by 2.8% and absorbed
11% of the force of bowstringing. Taping over the distal end of the
proximal phalanx decreased bowstringing by 22% and absorbed 12% of
the total force. Circular taping is minimally effective in relieving
force on the A2 pulley.
Drugs
As with any injury, the use of anti-inflammatories and pain killers may help, however remember that in the initial stages of the injury, the inflammation is part of the natural healing process, and pain killers stop pain. Pain means something isn't right and to stop, so if yo can't feel the pain, it removes the ability for you to listen to your body. This list is by no means exhaustive of all the techniques out there to aid recovery from a pulley injury. Returning to Climbing When returning to rock
or plastic, it is advised to start off easy, and slowly and gradually
build up your sessions, intensity and grade until you know the injury
has returned to the optimal strength. You may find it easier
to climb with open hand grips at this stage, and therefore climb
harder than otherwise thought, but it only takes one hold for you to
have to crimp to succeed, and you're back to square one. It's important to
listen to your body, especially during these phase, as it is so easy
to re-injure when that amazing looking problem entices you in, just
for a quick go. We are all guilty of this one! Preventative measures Taping, however, to prevent a pulley injury doesn't work, as it has been shown that the tape is not strong enough to absorb the forces involved in causing injuries. (Warme and Brooks 2000) Check out Chockstone.org for some more advise and info on taping. The usual basis of a proper warm up and easy climbing is an obvious, yet poorly practiced, preventative measure. If it doesn't feel good, don't do it! Changing your technique and style, and having a greater awareness of where your body is in space will mean you are less likely to have a foot slip, or need for dynamic moves to holds, therefore reducing the likelihood of injury. Avoid projects way beyond your current capabilities Variety is the spice of life - vary the duration, intensity, holds, style, angle and training tools used when climbing. Also, change your technique to utilise open handed grip instead of over-crimping every hold will reduce the force placed on the pulley system
Diagram to represent the forces exerted using crimp vs open handed Copyright Schweizer
As a beginner, remember that your muscles will adapt very quickily to an increase in workload, but the ligaments, tendons and pulleys take much longer to adapt, therefore making them more prone to injury. The key to this - progress your climbing in a sensible, progressive manner. And finally, ensuring you've had enough sleep, food, water etc to ensure a productive climbing experience! Hope this helps! Any question, feel free to ask! Obviously every case is individual, and this is merely for reference and information. If you have an injury - get it checked out by a professional! Check out ClimbingStrong.com for an interesting DIY method of rehab References Hochholzer T, Schoffl VR 2006 One Move Too Many. Lochner-Verlag, Germany Schwiezer A 2012 Sport climbing from a medical point of view. Swiss Medical Weekly 142: w13688 Schoffl V, Hochholzer T, Winkelmann HP, Strecker W 2003 Pulley injuries in rock climbers. Wilderness and Environmental Medicine 14: 94-100 Chapman G 2008 Finger injuries and treatment . Rock and Run Macleod D 2010 Pulley injuries article. Online Climbing Coach Schweizer A 2001 Biomechanical Properties of the Crimp Grip Position in Rock Climbers. Journal of Biomechanics 34:217 - 223 Schoffl
VR, Schoffl I 2007 Finger pain in rock climbers: reaching the right
differential diagnosis and therapy. Journal of Sports Medicine Physical
Fitness 47:70-78 Hauger O, Chung CB, Lektrakul N, Botte MJ, Trudell D, Boutin RD, Resnick D 2000 Pulley System in the Fingers: Normal Anatomy and Simulated Lesions in Cadavers at MR Imaging, CT, and US with and without Contrast Material Distention of the Tendon Sheath. Radiology 217(1): 201-21
Schwiezer A 2000 Biomechanical effectiveness of taping the A2 pulley in rock climbers. The Journal of Hand
Surgery: British & European Volume 25(1): 102-107
Warme WJ, Brooks D 2000 The effect of circumferential taping on flexor
tendon pulley failure in rock climbers. American Journal Sports Medicine 28(5): 674-678


